FULFILLMENTS - SETTINGS
Page content
General Settings
Enable the Fulfillments module – toggle the switch to the on position ![]() and other settings of the module will become available. After saving the settings and refreshing the page (using the F5 key, or the combination CTRL + R), the module will be accessible in the main menu and, depending on the permissions, also in all linked modules.
and other settings of the module will become available. After saving the settings and refreshing the page (using the F5 key, or the combination CTRL + R), the module will be accessible in the main menu and, depending on the permissions, also in all linked modules.
Simplified entry – this feature turns on a simple form for creating new fulfillments. When the switch is on ![]() , only the Customer, Linked to, Fulfillment Text, Assignee and Start Time can be entered in the fulfillment. The text of the fulfillment is not a mandatory item. The simplified entry is suitable if you want to use CDESK in the simplest possible form. The new fulfillment can be entered in Fulfillments->List of Fulfillments->Add a Fulfillment.
, only the Customer, Linked to, Fulfillment Text, Assignee and Start Time can be entered in the fulfillment. The text of the fulfillment is not a mandatory item. The simplified entry is suitable if you want to use CDESK in the simplest possible form. The new fulfillment can be entered in Fulfillments->List of Fulfillments->Add a Fulfillment.

Simplified time setup – the setting is only available if simplified entry of requests is turned off. If the switch is in the off position ![]() , the Start Time and the End Time are to be entered manually by default when entering a fulfillment. The fulfillment duration is then automatically calculated depending on the start and the end time. If the switch is in the on position
, the Start Time and the End Time are to be entered manually by default when entering a fulfillment. The fulfillment duration is then automatically calculated depending on the start and the end time. If the switch is in the on position ![]() when entering a fulfillment, you only fill in the Start time and the fulfillment duration. This setting can be changed directly in the fulfillment form.
when entering a fulfillment, you only fill in the Start time and the fulfillment duration. This setting can be changed directly in the fulfillment form.

Internal fulfillments – toggle the switch to the on position ![]() to make appear the button for entering internal fulfillments. Internal fulfillments are used to keep records of the internal work. These fulfillments are not accessible to the customer. Internal fulfillments reflect the time worked, whereas invoice fulfillments are the hours you invoice the customer for.
to make appear the button for entering internal fulfillments. Internal fulfillments are used to keep records of the internal work. These fulfillments are not accessible to the customer. Internal fulfillments reflect the time worked, whereas invoice fulfillments are the hours you invoice the customer for.

Automatic assignee selection – toggle the switch to the on position so the logged-in operator (that is the assignee) is automatically filled-in in the Assignee field when entering the fulfillment.
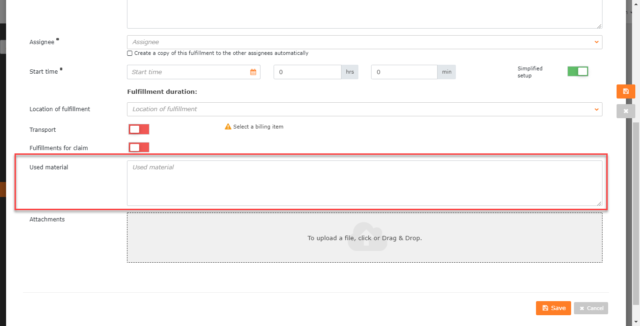
Used material – if the switch is on ![]() , the Used material text box will appear in the list when creating a new fulfillment. This setting is recommended if you do not use stock documents and you only need to keep records of the material used.
, the Used material text box will appear in the list when creating a new fulfillment. This setting is recommended if you do not use stock documents and you only need to keep records of the material used.

Insert the list of fulfillments to the email about the completed request – If the switch is on ![]() , the customer will receive an email notification of the request completion and then the list of fulfillments related to the given request.
, the customer will receive an email notification of the request completion and then the list of fulfillments related to the given request.
Block Add / Edit fulfillments for completed requests – If the switch is on ![]() , it will not be possible to add fulfillments to requests in the completed state. It will neither be possible to edit fulfillments in the completed requests.
, it will not be possible to add fulfillments to requests in the completed state. It will neither be possible to edit fulfillments in the completed requests.
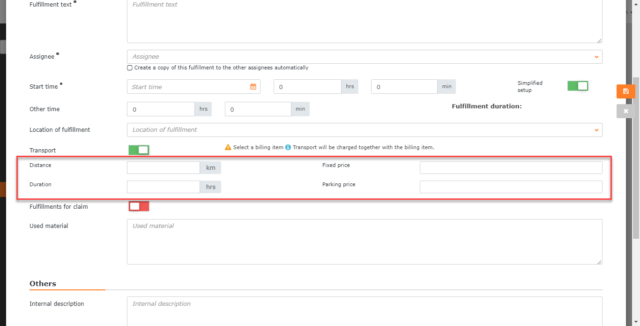
Shipping records – The Shipping Records function is automatically switched on if the Deals module is switched on. In this case, it is not possible to turn the shipping records off. If the Deals module is switched off, you can switch it on manually in the Shipping Records line in the global settings of fulfillments. After turning the switch on ![]() , when creating a new fulfillment, there will be an item Transport with a switch in the fulfillment detail. Turn it on to make available the following fields: Distance, Duration, Fixed price and Parking price.
, when creating a new fulfillment, there will be an item Transport with a switch in the fulfillment detail. Turn it on to make available the following fields: Distance, Duration, Fixed price and Parking price.

Fulfillments for claim – turn the switch on ![]() and the switch for Fulfillments for claim will become available in the fulfillment form. If this switch is on, the fulfillment will not be invoiced. Fulfillments for claim are in yellow in the list of fulfillments.
and the switch for Fulfillments for claim will become available in the fulfillment form. If this switch is on, the fulfillment will not be invoiced. Fulfillments for claim are in yellow in the list of fulfillments.
Automatically create the fulfillments for claim for the request types – this option allows you to select for which types of requests the fulfillments for claim will be created automatically. You can select the request types from the Global Settings->Requests->Types and Areas of Service. If you do not select any type in the request, the fulfillments for claim will not be created automatically.
Mandatory billing item option – if the switch is on ![]() , it will not be possible to save the fulfillment without selecting a billing item. Billing items can only be created in Deals.
, it will not be possible to save the fulfillment without selecting a billing item. Billing items can only be created in Deals.
Adding fulfillments to tasks – if the switch is on ![]() , it will be possible to assign the fulfillment to the task after creating a task. Fulfillments can be assigned to tasks only after selecting a link in the list of basic data.
, it will be possible to assign the fulfillment to the task after creating a task. Fulfillments can be assigned to tasks only after selecting a link in the list of basic data.
Invoice fulfillments – the following options are available, with separate settings for each date option in the Invoice field:
- All – all fulfillments will be invoiced, regardless of the status of the assigned request. When selecting this option, it is not possible to change the setting to specify the billing date. The option Beginning of fulfillment is automatically selected, that means the fulfillment is invoiced on the date specified in the fulfillment.
- From requests in completed state – it is possible to invoice only fulfillments that have been linked to the request and are completed. Selecting this option makes the following billing settings available by date:
- Beginning of fulfillment – the fulfillment is invoiced on the date specified in it
- Request completion date – the fulfillment is invoiced on the end date of the request
- The billing date specified in the request – the fulfillment is invoiced according to the billing date specified in the request.
- From requests in state accepted completion or completed without acceptance – it is possible to invoice only fulfillments that are linked to the request and are in the status Date of accepted completion or Completion without acceptance. Selecting this option makes the following billing settings available by date:
- Beginning of fulfillment – the fulfillment is invoiced on the date specified in it
- Request completion date – the fulfillment is invoiced on the end date of the request
- Date of accepted completion or completion without acceptance – the fulfillment is invoiced on the date when the completion of the request was accepted, or rejected
- The billing date specified in the request – the fulfillment is invoiced according to the billing date specified in the request.

Fulfillment emails
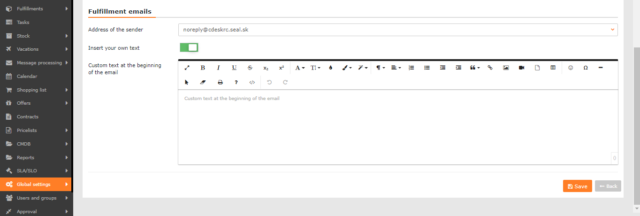
Address of the sender – An e-mail address is selected from the code list. The selected address will be listed in the e-mail notifications as the sender’s address. Addresses are selected in the code list in Global Settings-> Message processing-> Registered e-mail addresses.
Insert your own text – This feature allows you to insert a text into the email notification. When the switch is on ![]() , a box appears in which you can enter the text. At the top of the text box, there are tools for editing text and inserting multimedia.
, a box appears in which you can enter the text. At the top of the text box, there are tools for editing text and inserting multimedia.

