Simplified login and account creation for your customers via Microsoft Entra
We are committed to making access to CDESK more convenient and easier for all users. We’ve recently extended the ease of access to CDESK for your customers and end users who have an Office 365 account. As of version 3.2.6, it is now possible for customers to both authenticate users and create new CDESK customer accounts (client access). The aim is to free your customers from the need to remember passwords. This will increase convenience and save you money.
This functionality is available if your company uses its own domain or server in CDESK. Your customers and partners can log in with a single click from their Office 365 account using their Microsoft Entra ID. From CDESK version 3.2.6, the login supports external users from other Office 365 tenants (multi-tenant). Read more in the articles MS Entra ID – Basic Authentication and MS Entra ID – Multi-Tenant Authentication.
This is followed by the automatic creation of customer accounts and your customers can create customer accounts without the need for administrator intervention. The system will allow them to create a new account based on the data from the MS Entra ID. In this version 3.2.6 you still need to fill in the first name, last name, phone numbers manually, but from version 3.2.7 we will bring improvements, and the data will be filled in by CDESK automatically. You can read more about this in the article Self-service creation of customer accounts.
We have also added detailed instructions to the documentation on setting up Google authentication, which was introduced in the previous version. You can read more in the documentation in the Google Authentication article.
Microsoft recently renamed Azure AD to Entra ID, and we’ve updated the CDESK naming conventions to reflect this change.

New Approval Role: Requester’s Supervisor
Version 3.2.6 introduces a new role in the approval process. Although the requester’s supervisor could be the approver in the past, users now have the option to include this role in the approval steps to better customize their internal processes.
The requester is the user who created the request. You can verify the requester by adding the Created By column to the list of requests. At the same time, the details of the requester can be found in the details of each request, in the bottom left corner.
Note: This information is not always the same as the user in the Requested By field.
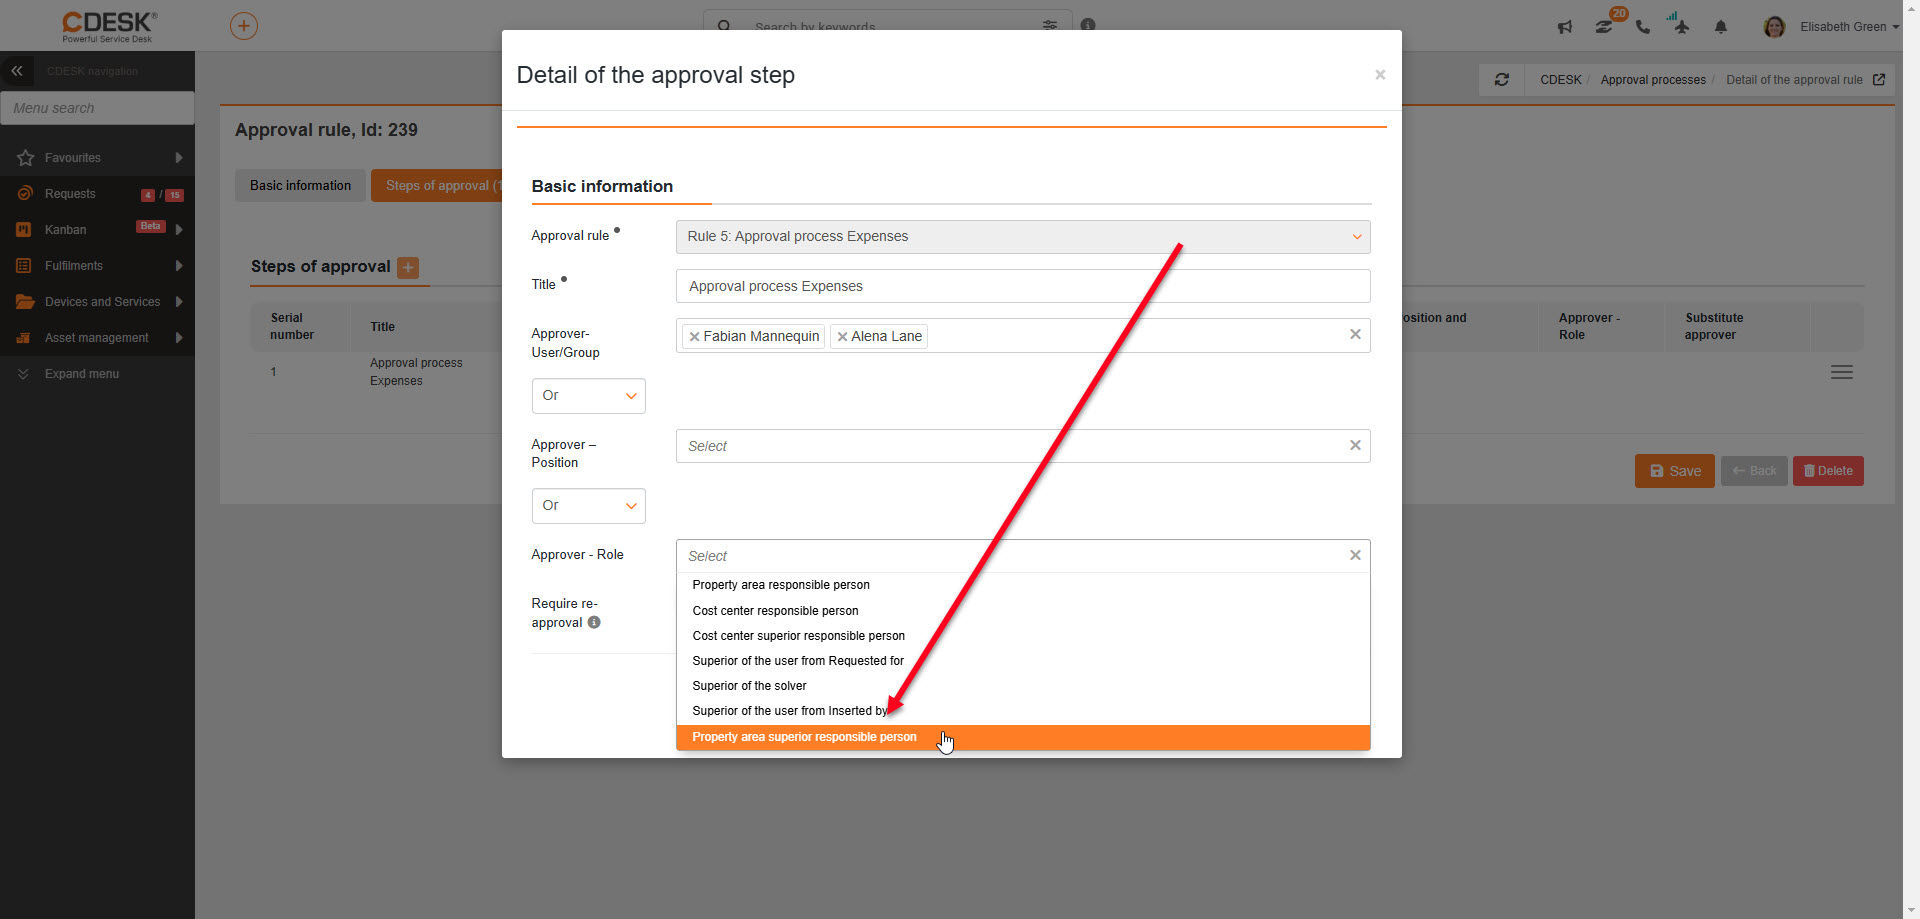
This role is assigned in the Approval Rules settings. Go to Approvals > Approval Rules in the navigation menu. Select or create an approval process and select/add a specific step in the Approval Steps tab. Here you can select approvers by role or position.
In CDESK, an assignee may not have an assigned supervisor in the system. In this case, the approval will be transferred to alternate assignees. Similar logic applies if no assignee is listed in the request.
Note for CDESK Easyclick: Requests submitted via Easyclick (using the C-Monitor client) currently have a separate account as the requester, for which it is not possible to specify a supervisor for each requester. We are working on a change so that Easyclick will also present the CDESK customer account directly, and then a supervisor can be specified for approval.


Custom Number Series of Requests
With each release we add more options to customize your CDESK environment. The latest addition is the ability to create separate numeric lines in the requests, under which you can register selected types of requests. Such a series consists of a unique prefix. The universal request prefix in CDESK is CDR.
The basis for using this feature is the creation of the request type. In Global Settings > Requests > Types, Categories and Service Areas, you can easily create and set up request types. Once you have created a request type, it is important to confirm the steps by pressing the Save button.
Then, under Global Settings > Requests > Basic Settings, locate the Separate Number Series section. Here you can create a custom number series (second in order, as the default series cannot be deleted). Simply enter a custom prefix to associate with the request types you select below. Once you have made your selection, press the Save button again.
The change will be reflected when a new request is created. If this is a request type to which you have assigned a custom queue, the created request will be registered as the first one in this queue in the request list. For example, if you have selected a prefix of the form „ABC“, the request will have the number „ABC-1“. The separate number series will also be translated into the sidebar of the request.
Note: If you have set up custom request codes in your environment, the option to create a custom series is not enabled. The text in the Separate Number Series section will alert you to this.

Advanced Tag Management for Requests, Tasks, Deals, Projects
With version 3.2.6 we have improved the visual organization of tags and added tags to the Deals and Tasks. There is a new interface to create and manage them. Instead of the previous simple tag entry, you will find in Global Settings > Tags, Categories, Units a clear table with a list of used and created tags. Tags can be removed at any time.
Thanks to the wide range of colours, you can customize each tag to your liking, specifying both the text and the background colour. Once you’ve created a tag, you can see how it will appear on each object. The number of occurrences column shows the type and number of objects to which the tag is assigned. If the tag is not used at all, an exclamation mark with the text „This tag is not used“ will appear next to the number of occurrences (0).


Requests
Visualization of request emails based on the sending address
CDESK allows you to customize the appearance of email notifications based on the sending email address. You can select a colour scheme for the sending email address from a wide range of colours. You can also add a custom logo to the settings that appears in the message header.
You set the choice of logo and colour scheme for each email address separately. When you open Global Settings > Message Processing, select the row with the selected email address, move the cursor to the Sending Mail section next to the active method of sending mail. A cogwheel icon appears – click on it to open the settings window.


Notifications of requests to the customer contact responsible for the branch
Following the functionality of the visibility of requests for a given branch, we have enabled in the settings of the Main Groups of Items in the CMDB to set a link to the responsible person for the branch. When you click on Branches in the Main Item Groups list, you have the following options in this field:
- Disabled – default setting,
- Optional,
If either of the last two options is selected, the details for each branch in the CMDB will display the option to select the user responsible for the branch. This can be any CDESK account in the environment.
It is also possible to set up simple visibility and concurrent notification options for these messages from the account settings page. In the account settings, under the Branches tab, all the branches of the available companies are displayed for you to tick. The Branches tab in account settings is displayed when you select either Optional or Mandatory in Global Settings -> Requests à Select Branch.

It is possible to set up notifications in CDESK so that the person responsible for the branch is notified of any request that contains their branch (as an attached CI). Notifications are set up in Global Settings > Notifications, where a Person Responsible for Branch role can be added to each request.

Option to open the computer detail from CM IT monitoring directly from the Easyclick request
A user with permission to access the technical part of the request can use the CM-ID in the request to go directly to the linked device. Clicking on this ID will take the user to CM > Views > Computers, where they will be taken to the specific device with that ID.

Changing the behaviour of the request list after disabling a saved filter
When working with requests, if you have the ‚saved filter‘ enabled and then disable it, the default view of the request list will be enabled. If a default saved filter is set in the Requests module, it will be activated. Previously, when the saved filter was disabled, all requests were loaded, which slowed down work in CDESK.

Using the mouse wheel to open a regular request in a new window
A small but handy change has also been made to regular requests where you can now open the details in a new browser window using the middle mouse wheel. Simply click the wheel on the request name. This feature was missing in previous versions, which could make working with regular requests slow and uncomfortable.

Linking CDESK and JIRA Environments
Synchronization of comments between CDESK and Jira
We are improving the level of integration with the Jira system. With the current version of CDESK, users can post comments in linked Jira tasks via the connector. In a request linked to at least one Jira task, a new button „+ Jira Comment“ appears in the Discussions tab.
Adding a comment works the same way as creating other discussion posts, but instead of selecting target email addresses, linked Jira tasks in the request are chosen, into which the comment will be inserted. We have retained the option to attach files to the post, but the Template and Signature fields are not available in these cases.
After posting a comment in a Jira task, this comment appears in the discussion under the linked request. The post is colour-coded to distinguish it from internal discussions and customer discussions.
Notification settings for posts to Jira tasks are configured in Global Settings > Notifications > Basic Settings. In the CDESK notifications section > Requests, find the Jira connector, where you can assign permissions to multiple roles.

New permissions to work with Jira tasks in CDESK
To better control access to the Jira tab in the request, we have added new permissions that are assigned in the Permissions tab in each user’s details. More permissions will ensure order and control over workflows. Under Requests > Tab Access > Jira, you will find the following permissions:
- Adding – ability to create links and new tasks,
- Editing – ability to edit a task,
- Deleting – ability to unlink to a task in Jira.
In Requests > Discussion > Jira comment section, we will add:
- Viewing – permission to access Jira comments,
- Adding – ability to add comments to Jira via CDESK,
- Deleting – ability to delete comments.
Enhanced Connection of Requests from Two CDESK Environments (CDESK Connector)
New permissions to access the Connected Ext. Requests tab
The connection to other CDESK environments is indicated by the Connected External Requests tab in the details of each request. Access to this tab is limited by the permissions that can be assigned to users in the Users and Groups section of the navigation (left) menu.
In this way, customer accounts can see both the tab and the created requests from the external environment, even if they do not have the ability to create such requests. Users without permission will not see the tab.

Fulfilments
Filtering and exporting of internal fulfilments without link to billing fulfilments
Internal fulfilments are coloured blue in the CDESK system to distinguish them from billing fulfilments. Internal fulfilments linked to invoicing fulfilments are marked in dark blue, while stand-alone (not linked to billing fulfilments) internal fulfilments are in a lighter shade. To make it easier to work with the second type of internal fulfilment, we have added a direct filtering option in the new version. A new filter has been added to the list of fulfilments – Link to the billing fulfilment with the options contains/is and filled/not filled.
In addition, we have added a Link to the Bill. Fulfilment column to the list of fulfilments, which displays the number of the parent billing fulfilment. This column can be included in the fulfilment list export.

Ability to bulk delete drafts from the fulfilment list
With version 3.2.6, we have added the ability to bulk delete drafts in the list to all modules where you can create drafts (Requests, Fulfilments, Tasks). To remove drafts, scroll to the right of the filter icon button above the list. After selecting the Remove all drafts option, the user must confirm the selection in a modal window. All drafts that are visible in the user’s list will then be removed from the list. Exceptions to this are fulfilment drafts from regular requests, which are not covered by this feature. Drafts that the user does not have access to will also remain unchanged.

Selection of currently accepted stock offer items on a fulfilment
In a request containing an offer with an accepted item, it is possible to create a fulfilment to which you can add the item within the issue note. When creating a fulfilment, select the „+ Issue note from accepted offer items“ button in the Stock Issue Notes section. After selecting an accepted item, the price, quantity and VAT will be filled according to the selected accepted item.
The selected item will no longer be available for further issue notes.


Summary line of transport from internal fulfilments in the fulfilment list
In the summary row of the fulfilment list, you can now also see the transport data from internal fulfilments. Below the black data from the billing fulfilments, you will find the distance in kilometres and the time spent on the transport, separated from the data from the billing fulfilments. For better differentiation, this summary information is also highlighted in blue, which in CDESK is inherent to internal fulfilment.
This data is only displayed if there are internal fulfilments with transport data in the list. At the same time, only users with permission to read the internal fulfilment records have access to them.

Work Orders
Added search for work orders by parent request
To make it easier to navigate CDESK, we have changed the logic of the work order search. When searching by parent request, characters from the request number are used, not just the name. In this way we have eliminated mismatches where there are multiple requests with the same name. If you also set the „request is“ condition, a list of requests (in number + name format) will be displayed in the third field when clicked.

Deals and Invoicing
Hourly rate displayed in the list of companies
If a company has at least one billing item of the type „Hourly Rate“ in the Billing Items tab, this value will be displayed in the list of companies in the newly available Hourly Rate column. This makes it possible to search for companies based on the price of their work. The column can be part of the company list export.

Billing item templates in customer details
In the previous version of CDESK, we added a new „Billing Items“ tab for companies, which contained the company’s price list for their work, as well as their transport rates.
Now we have made some changes to the tab. The tab has been renamed to „Billing item templates“. The entries in this tab will automatically be assigned to future deals in which the company is involved. A notice in the tab will also remind you of this.

Enhancement to set additional fields as mandatory
We have added options to set more fields as mandatory. In the new Field Obligation section, added to the Global Settings of the Deals module, you can specify whether you want to make the field mandatory, optional, or not to display the field at all. You can choose to make the following fields mandatory:
- Deal code
- Customer contact
- Expected start date
- Start date
- Expected end date
- End date
The default value of these fields is set as optional in the CDESK system. It is important to save any changes you make, otherwise they will not take effect in normal use.

Configuration Database (CMDB)
Link to the branch responsible person in the customer role, including notifications of requests involving such a branch
We have added a link to the person responsible for the branch to the „Branches“ in the Main Groups of Items. This makes it possible to assign a responsible employee to the branch who is in charge of the branch. This person can be notified when the linked item is added to the request. The link to the person responsible for the branch can be set as:
- Disabled – default state,
- Optional – after activation, it will be possible to select the person responsible for the branch,
- Mandatory – after activation, at least one user from CDESK must be selected to be responsible for the branch.
Any user from a given CDESK environment can be selected for this role.
Kanban
Editing multiple fields in the right panel
In previous versions of CDESK, the user could already edit the Kanban object fields in the sidebar. However, version 3.2.6 introduces the ability to edit the Deals field, as well as the ability to fill the Requested By and Requested For fields with custom text.
Editing fields in the previous version was slow, as it was necessary to confirm the change in each field separately. To speed up the process, we have added the ability to edit fields in bulk. Change any number of fields and confirm by pressing the side key to save or confirm the selection under one of the edited fields to confirm all changes in bulk.
The system will warn you beforehand that you are about to save multiple changes, and if all the required fields are filled in, the bulk edit will be saved.

Card layout: request type determined by global settings
The visibility of the attributes of each request in the Kanban tab is subject to the default configuration in the Global Settings in CDESK. With version 3.2.6, the user can choose to edit the tab layouts according to request types. For each type, the user can set different attributes to be displayed on the card. To change this, go to Global Settings > Kanban, and click the menu on the right side in the current tab row. You can make changes in the Card Layout tab.

Address Book
Permissions to hide and edit tabs in companies
To give you more control over your environment, we’ve added the ability to grant or remove permissions to edit/hide tabs in the Company Detail section of the Address Book module. These permissions are traditionally granted in the Users and Groups section of the navigation menu.

Asset Management
Type designation added to advanced search
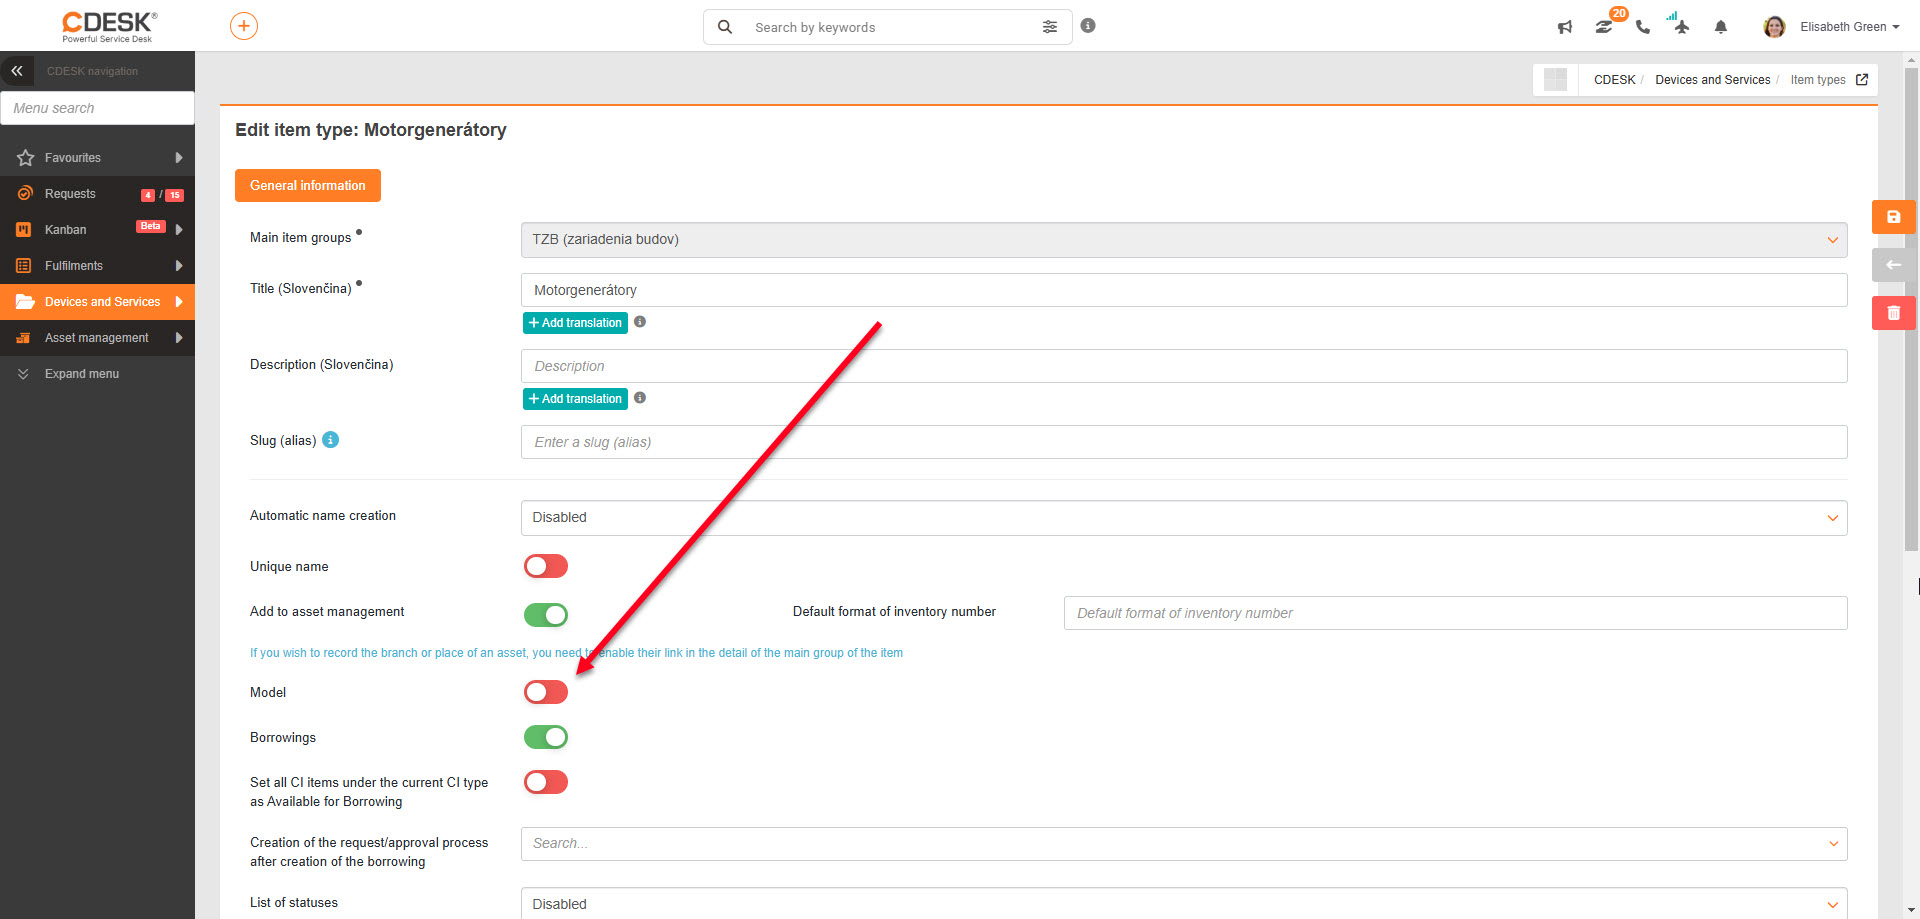
You can now search for objects in the Asset Management by type designation. This option is part of the advanced search and can be disabled at any time. To be able to search in the Asset Management by type, this option must be enabled for at least one item type in the configuration database. To enable it, go to CMDB > Item Types. Select an item type from the main group and activate the switch called Model (see figure below).
Projects
New role: Observer
The Observer field has been added to Projects and Deals. The account selected in this field can follow the project/deal without being able to edit it. This role can also be used for advanced searches in the list of projects and deals in the format „Observer is/is not, contains/does not contain, is filled/is not filled.“
The Observer field can be activated for both projects and project deals. In Global Settings > Projects, the default option for this field is Disabled (Optional and Mandatory options are available). The same field can be found in Global Settings > Projects > Project Deals.
Access to the Observer field in CDESK is subject to the permissions that can be assigned to users in Users and Groups > Users. After selecting a user and opening the Permissions tab, navigate to Projects > Field Access. In the right section you have the option to make this field visible or editable.

Central search
Catalogue of requests added to central search
With the new version, you can search for tiles from the catalogue of requests in the central search. This includes searching for matching results in linked tiles, i.e. all linked tiles that contain the search/match term are displayed in the results.
The description of each tile that the user enters when creating it is also searchable. The content of the short description is displayed in the search results, the long description is only displayed when the cursor is hovered over the found result.
The process is facilitated by keywords, in the case of templates type the abbreviation cdrt (cdesk request template) before the search term, in the case of tiles tile or Slovak term for tile dlazdica.

The item found in the central search results can be opened in a modal window
In previous versions it was possible to search for an item and click to go to it. The latest version allows you to open the item in a modal window. This allows you to review, edit or delete the object and then continue working when the modal window is closed.
To open the window, click on the icon to the right of the object you have found.

New component for keyword management
In recent releases we have also focused on streamlining and simplifying the central search in CDESK. The latest version includes a component for adding and removing keywords. The aim was to save the user unnecessary memorizing and learning of keywords.
Next to the search field there is a button with a filter icon. This button is called Search Help and when you click it, a window will appear with keywords, i.e. shortcuts, which allow you to search for specific objects in CDESK.
After selecting fields, the specific keywords are moved to the search field and the user continues the search by entering a name or number, while CDESK automatically searches only the objects you have selected. The procedure can also be reversed. First enter the search term in the search field and then select the keywords. The result is the same in both cases.

Request discussions have been added to the search
If this feature is enabled in the global settings, you can also search for discussion posts using the central search. The fact that the term is in a discussion is indicated in the search by both the title and the discussion icon on the left.
It is also possible to search external email requests. This can be set in the global settings for requests.

Borrowings
More intuitive display of buttons to cancel and return borrowed items
To avoid unnecessary confusion when borrowing, we have adjusted the visibility of the „Cancel“ and „Return“ buttons so that they only appear when they can be used. The visibility of the buttons depends on several factors: partial visibility or the absence of a button means that the operation cannot be performed.
The Cancel button is available if the borrowing term has not yet started, but the borrowing request has been entered in the system. The button can also be used if the request has not been completed or the borrowing has not gone through the approval process.
The Return button appears for completed processes. An expired borrowing date, completed request or approved process will make the button available, clicking it will end the borrowing.
The Return button also serves as a reminder in the new version. If the request is not in the Completed state or the approval process has not been completed, the button is displayed but cannot be clicked. When the cursor moves over the button, information about the step that prevents the button from being pressed („Waiting for request to be completed“, „Waiting for approval“) is displayed.

Approval
Approval role added: Supervisor of the person responsible for the asset area
If the person responsible for the asset area has a designated supervisor, that supervisor can be set as the approver under the new role: Supervisor of the person responsible for the asset area.
Users and Groups
Security enhancement: ability to disable active user
Internal security and data security are also very important to us. In the past, it was not possible to deactivate a user if objects (tasks, requests, deals) were bound to them. We have therefore enabled administrators to deactivate such accounts. The system notifies them that the account is a request assignee or is linked to objects in CDESK. However, this is only a notification and does not prevent the administrator from deactivating the account.
A deactivated account is marked as disabled in existing objects. It cannot be assigned to objects or to any fields where user accounts are selected. A disabled account appears in the list with its name crossed out.
However, the account is still listed in searches and can be searched. The „contains“ option in the advanced search will indicate that it will also search between disabled accounts.
When the account is restored, the administrator has the option to retrieve the user’s audit, which allows the links between the user and items in CDESK to be checked again.

General Features
The language selected at login will not be applied unless it is enabled on the environment
Each user can select a language in the login window. If you click on a particular language, the login window will change to reflect that choice. However, if the selected language is not enabled on the environment, CDESK will automatically revert to the main default language. You can set the main language (and enable others) in Global Settings > Language Settings.